Difficulty
Very Easy
How to inflate your bike tyres
Inflating bicycle tyres is a simple task once you know how. Follow these steps to master this essential skill
James Howell-Jones
Junior Writer


Pumping up the tyres on your bike is a basic skill that every cyclist needs to know. With a couple of pointers, it's a simple task that anyone can do.
You can use both a small 'mini pump', or a larger 'track pump' for this job. A pocket-sized mini pump is great for when you're out on a ride, but track pumps are much quicker and easier, so it's worth investing in one, even if you just ride around town.
Tyre pressure, how hard you pump up the tyres, is individual, and depends on your weight and the width of your tyres, as well as the kind of riding you're doing. Find the right pressure for you using one of the many tyre pressure calculators on the internet, like this one from Silca.
Read more:
Tools Needed

Step 1
Get the right pump
When choosing a bike pump, ideally you want to get two – a small pump to carry when you’re out riding and a proper track pump with a gauge to keep at home. It's easier to keep your tyres properly inflated with a track pump and it’s always a good idea to check your pressures before setting off on a ride.

Step 2
What kind of valve?
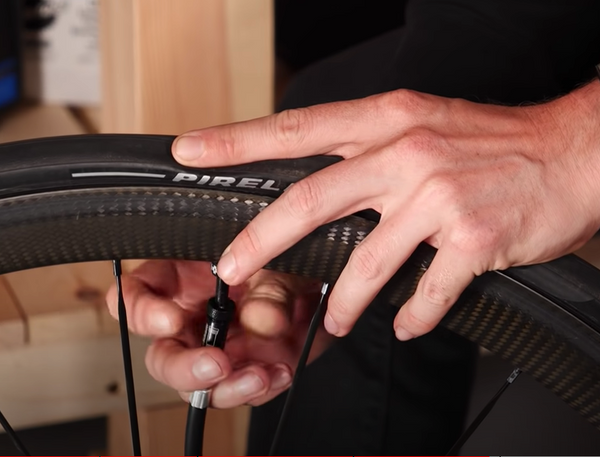
To start, unscrew the plastic dust caps on the valves and keep them somewhere safe so they don’t get lost. Next, figure out which valve type you have. You’ll most likely be running Presta valves, easily identified by a little knurled pip in the top. But if you’re riding an older town bike, for example, you may have Schrader valves, as used on car tyres.

Step 3
Set your pump for your valve
Pumps will almost always have an attachment for both of these valves types, so make sure you use the correct connection for yours. If you’re not sure, a Presta valve will fit in the connector that is deeper and thinner, while a Schrader valve connector will be shallower and wider. You might have to unscrew and flip over the valve connector to change the type of valve it fits.

Step 4
Calculate the right pressure
The best pressure to run your tyres at depends on all sorts of things – tyre size, rim width, rider weight, terrain and more. If you’re unsure, a good starting point is to look at the recommended psi stated on the walls of your tyres (see Top Tip), or use a pressure calculator that most tyre manufacturers provide online.
Top Tip
Run your tyres too hard and you’ll feel every single bump in the road – no matter how small they may be. Too soft and your bike may feel less precise when cornering and you run the risk of getting pinch flats (aka snakebite punctures) when riding over potholes, etc.
The best way to find the tyre pressure that suits you is to start around the manufacturer’s maximum setting, see how that feels and work your way down 5psi or so until you find your sweet spot. Bear in mind that the bigger the tyre, the lower you can go with your minimum pressures.

Step 5A
If you’re at home, fit the track pump and inflate the tyre
If you have presta valves, unscrew the little knurled pip on the end of the valve. It’s important not to damage the valve when connecting your pump. Place the head on the valve, and push it down – you may need to also press on the tyre to apply enough pressure. Once fully inserted, pull the lever (if your pump has one) towards you to lock it into place.
You can then pump up the tyre.
Step 5B
If you’re mid-ride, fit a mini pump and inflate
On the road you’re likely to be using a pump with a threaded hose connector. If it’s detachable, it’s easier to connect the hose to the valve first, then connect the hose to the pump. If not, just thread it onto the valve, applying a little pressure to ensure the threads engage properly past the rubber seal.
If using a threaded mini pump, take care not to remove the valve core as you wind the pump off – as all the air will come out in one great gush. If this happens, re-insert the valve core and carefully tighten it with pliers or a tyre lever – some brands of lever have a built-in valve core tool.
Top Tip
Most mini pumps don't have a pressure gauge. On a road bike, the tyres should be firm enough that you can just about squeeze them with your finger and thumb. Leave them too soft, and you might get a pinch flat. Too hard, and you'll have a harsh, uncomfortable ride.

Step 6
Disconnect the pump and close the valve
If you’re using a track pump, to disconnect the pump, return the lever to its original position and carefully pull off the head. Then, if running Presta valves, tighten down the little knurled pip to seal. Replace the dust caps.

GCN's Essential Road Bike Maintenance
For road, gravel, commuter and hybrid bikes, Essential Road Bike Maintenance is intended to be a proper bible to all those essential bike maintenance, repairs, and set-up tasks that we all need to know. Everything from basic bike set-up, how to get your wheels on and off, through setting up gears, bleeding brakes, and beyond to things like installing electronic gears, converting to a 1x transmission and more. In a nutshell, pretty much everything you would want to tackle on your bike (or bikes, plural) yourself. And then some. Like bike set up tips for taller and shorter riders; bottom bracket standards explained; common bike maintenance mistakes and how to avoid them; essential roadside fixes to keep you riding; how to make your bike more comfortable; how to puncture-proof your ride and much, much more. “A huge amount of knowledge, hacks, and know-how to help improve both your workshop skills and your ride” – Ollie Bridgewood, GCN Presenter Each chapter is structured with the tasks you’ll most likely need more of the time at the start (like how to adjust your gears, replacing brake pads, or changing a tyre), before running through to those that you’ll do much more infrequently (such as changing disc brake hoses, servicing a freehub or pedals, and so on). This also means that many of the tasks naturally ratchet up in difficulty as you go through each chapter which should also mirror your natural progression as you become more mechanically capable and confident. In short, 260 pages packed with all the essential knowledge you’ll need to confidently take on and complete pretty much any bike maintenance task. Get Some ‘Show-How’ With Your ‘Know-How’ Each walkthrough is linked to a companion video which you can watch for free from your computer, tablet or smartphone. To watch, either type in the walkthrough’s short-link URL – e.g. https://gcn.eu/GetPerfectShifting – into your browser, or scan the QR code with your smartphone or tablet so you can get the best of both worlds: know-how and show-how. Simple. All you need to know to fix your bike. Product Details: Pages: 260 (120sm) Size: 280mm (h) x 216mm (w) (portrait) Cover: Paperback Cover Finish: 300gsm, silk stock with anti-scuff matte laminate and spot UV gloss finish Please note: There may be some additional shipping charges for orders consisting of 2 or more books. However, our customer service team will contact you after you have placed the order to advise on delivery options. Click here to explore all GCN best selling books

Related Content

How to wax a bike chain
Waxing a chain is more complicated than applying lube but it's worth the extra effort

Beginner indoor training session: 20-minute sweet spot indoor cycling workout
If you're new to indoor training, this is a good session to start with. No super hard efforts or high cadences, just a good, entry-level session that will burn calories

How to change the stem on a road bike
A new stem can transform the fit and feel of a bike. Here’s how to replace a stem on a road bike

Take it easy! 25-minute aerobic indoor cycling workout
A steadier workout for low-intensity days, or for building into your indoor cycling gradually