Difficulty
Easy
How to replace a bike chain
If your chain is worn out, here's how to swap it for a new one
Tom Hallam-Gravells
Online Production Editor


How to Steps
Check your chain for wear
Change into the small chainring and sprocket
Find the quick link
Open the quick link
Find the joining pin
Remove the chain pin
Remove the chain
Measure the old chain against the new one
Shorten the new chain
Thread the new chain through your drivetrain
Join the quick link
Alternatively, push in the chain pin
Snap off the end and free up the link
Check your gears
Tools Needed

Step 1
Check your chain for wear
Chances are, you'll be replacing your chain because it's worn out. To check how worn your chain is, use a chain checker. These devices show the extent to which your chain has 'stretched', or become elongated because of wear in the pins.
On 11, 12 or 13-speed bikes, you should replace your chain when it's 0.75% stretched.

Step 2
Change into the small chainring and sprocket
Put your bike in a work stand, if you've got one, and change into the smallest chainring and the smallest cog on the cassette. This will reduce the chain tension, making it easier to manage and remove the chain.

Step 3A
Find the quick link
Spin your chain slowly, watching as you go for a quick link or 'master link'. Not all chains will have one.
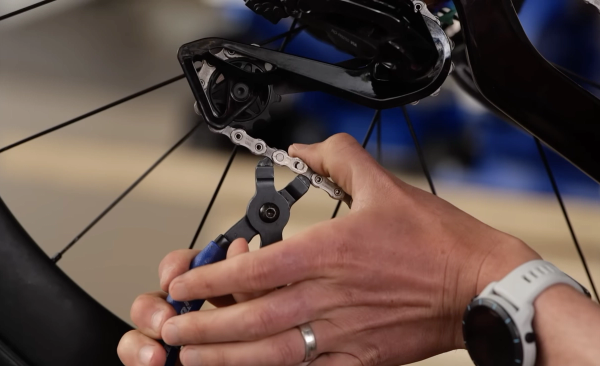
Step 3B
Open the quick link
If you have a quick link on your chain, open it up by squeezing the links together. You can use needle-nose pliers for this, but it's far easier with bike-specific chain link pliers.
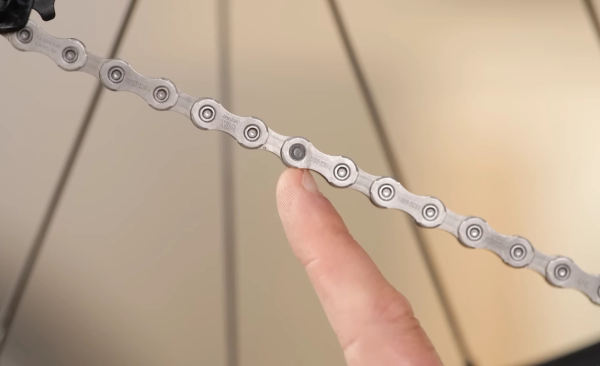
Step 4A
Find the joining pin
If your chain doesn't have a quick link, you'll need to take it off using a chain breaker tool. If your old chain is going in the bin, it doesn't matter which link you break, but if you want to reuse the chain, find the joining pin. It looks slightly different to the other links, as you can see.
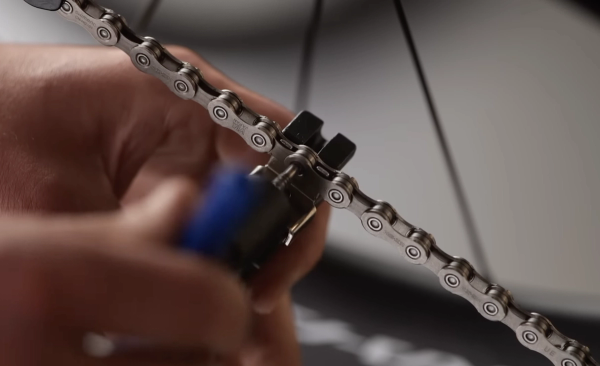
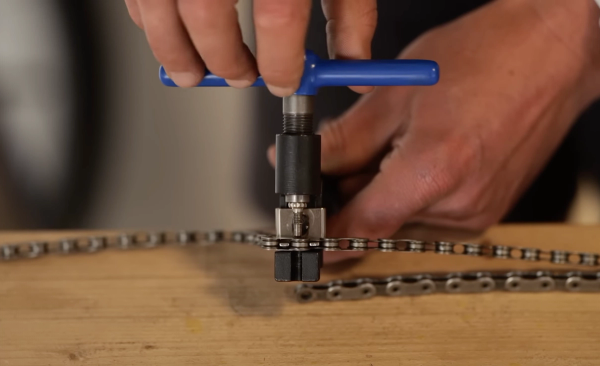
Step 4B
Remove the chain pin
Use a chain breaker tool to push the pin out of the chain. To do this, position the link in the chain breaker and screw down the pin, making sure it's dead straight – the pins on chain breaker tools can snap if they're pushed in at an angle.
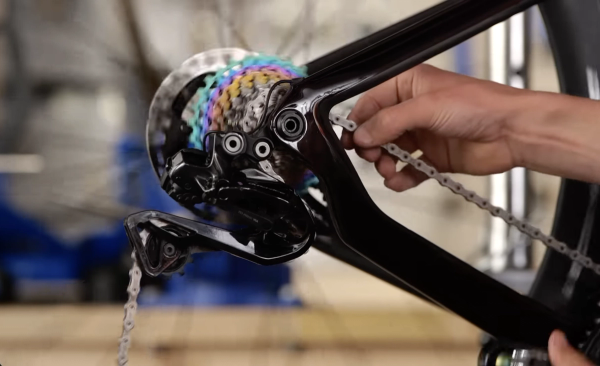
Step 5
Remove the chain
Remove the old chain. As you do so, pay attention to the route the chain takes through the rear derailleur, so you can put the new one in correctly.

Step 6
Measure the old chain against the new one
To match the length of the new chain with the old one, lay them side by side and use the chain tool to align their lengths. The chain length should be short enough that there is no slack in the chain when in the smallest front chainring and smallest rear cog, yet long enough so that the rear derailleur isn't overly stretched in the largest gear combination.
Watch: Why chain length matters and how to get it right
Step 7
Shorten the new chain
Once you've measured your new chain against your old one, you can shorten the new chain accordingly. Make a note of which link needs removing then press it out using the chain breaker.
If you're using a quick link, bear in mind that the quick link needs to attach to two inner chain links, and that the quick link adds half a link to the chain's overall length.

Step 8
Thread the new chain through your drivetrain
Chains are directional, so make sure that the side of the chain with text printed on it is facing outwards from the bike.
Then, route the chain through the pulley wheels, cassette, and chainrings, ensuring it follows the correct path. Position the two ends of the chain together on the lower run.

Step 9
Join the quick link
If you're using a quick link, make sure the arrows on it are installed in the direction of travel when pedalling. Position pliers around the quick link and pull them open to click the link together.

Step 10A
Alternatively, push in the chain pin
If using a joining pin, place the chain tool through a gap in the spokes and align it with the joining pin. Slowly turn the tool's handle to push the pin from inside to outside, until it's flush with the inner surface of the chain links.

Step 10B
Snap off the end and free up the link
Remove the tool and snap off the excess from the chain pin. The link with the chain pin will be a little stiff at first, so flex it in your hand to free it up.

Step 11
Check your gears
Run through all the gears to ensure smooth shifting. Test the chain on the little chainring, big chainring, and various cogs on the cassette. Make any necessary adjustments to ensure proper functionality.
If your gears are working well, you're done. Just make sure to keep the chain clean and lubricated over the coming weeks and months.
Jargon Buster

GCN's Essential Road Bike Maintenance
For road, gravel, commuter and hybrid bikes, Essential Road Bike Maintenance is intended to be a proper bible to all those essential bike maintenance, repairs, and set-up tasks that we all need to know. Everything from basic bike set-up, how to get your wheels on and off, through setting up gears, bleeding brakes, and beyond to things like installing electronic gears, converting to a 1x transmission and more. In a nutshell, pretty much everything you would want to tackle on your bike (or bikes, plural) yourself. And then some. Like bike set up tips for taller and shorter riders; bottom bracket standards explained; common bike maintenance mistakes and how to avoid them; essential roadside fixes to keep you riding; how to make your bike more comfortable; how to puncture-proof your ride and much, much more. “A huge amount of knowledge, hacks, and know-how to help improve both your workshop skills and your ride” – Ollie Bridgewood, GCN Presenter Each chapter is structured with the tasks you’ll most likely need more of the time at the start (like how to adjust your gears, replacing brake pads, or changing a tyre), before running through to those that you’ll do much more infrequently (such as changing disc brake hoses, servicing a freehub or pedals, and so on). This also means that many of the tasks naturally ratchet up in difficulty as you go through each chapter which should also mirror your natural progression as you become more mechanically capable and confident. In short, 260 pages packed with all the essential knowledge you’ll need to confidently take on and complete pretty much any bike maintenance task. Get Some ‘Show-How’ With Your ‘Know-How’ Each walkthrough is linked to a companion video which you can watch for free from your computer, tablet or smartphone. To watch, either type in the walkthrough’s short-link URL – e.g. https://gcn.eu/GetPerfectShifting – into your browser, or scan the QR code with your smartphone or tablet so you can get the best of both worlds: know-how and show-how. Simple. All you need to know to fix your bike. Product Details: Pages: 260 (120sm) Size: 280mm (h) x 216mm (w) (portrait) Cover: Paperback Cover Finish: 300gsm, silk stock with anti-scuff matte laminate and spot UV gloss finish Please note: There may be some additional shipping charges for orders consisting of 2 or more books. However, our customer service team will contact you after you have placed the order to advise on delivery options. Click here to explore all GCN best selling books
.jpg?w=600&auto=format)
Related Content

How to wax a bike chain
Waxing a chain is more complicated than applying lube but it's worth the extra effort

Beginner indoor training session: 20-minute sweet spot indoor cycling workout
If you're new to indoor training, this is a good session to start with. No super hard efforts or high cadences, just a good, entry-level session that will burn calories

How to change the stem on a road bike
A new stem can transform the fit and feel of a bike. Here’s how to replace a stem on a road bike

Take it easy! 25-minute aerobic indoor cycling workout
A steadier workout for low-intensity days, or for building into your indoor cycling gradually