Difficulty
Easy
How to adjust a Shimano clutch derailleur
Clutch derailleurs help to reduce chain slap by keeping the chain tensioned, but they need to be adjusted every so often to maintain performance. Here's how
Tom Hallam-Gravells
Online Production Editor


Clutch derailleurs are becoming increasingly common on gravel bikes, and also some road bikes with 1x drivetrains.
Borrowed from the world of mountain biking, they are designed to eliminate chain slap. This usually occurs on rugged terrain when the chain bounces about, which can cause it to hop off the drivetrain completely or, worst still, damage the chainstays. A clutch derailleur uses friction that resists forward movement in the derailleur cage, helping to keep the chain tensioned.
Like many parts on a bike, clutch derailleurs aren’t fit-and-forget components and instead require occasional maintenance. In this guide, we’ll take you through the process of maintaining a Shimano clutch derailleur.
To complete the job, you’ll need a 2mm hex key and a small spanner. A brake cleaner or isopropyl alcohol could also be handy if you need to clean the derailleur area too.
- Read more: How to replace your rear derailleur
Tools Needed
Step 1
When does a clutch derailleur need maintaining?
While you should maintain a clutch derailleur every so often, there are some clear signs that it is in need of a bit of care.
Shimano’s clutch derailleurs have an ‘on’ and ‘off’ switch. In the ‘off’ mode, it will function like a regular derailleur. When in the ‘on’ mode, there should be tension when you try to push the derailleur cage forward. If there’s only minimum friction or none at all, the derailleur needs servicing.
You can also spot issues when riding if, for example, the chain is bouncing around more than usual when in the ‘on’ mode.

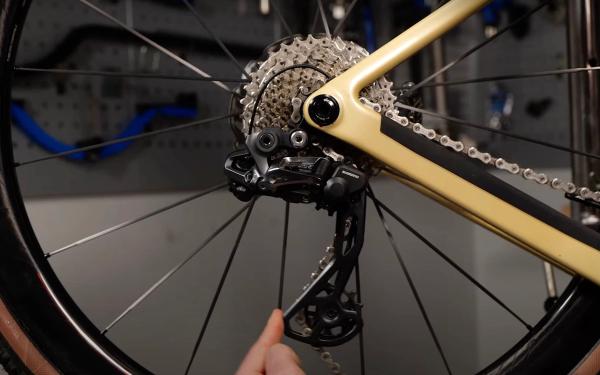
Step 2
Remove the cover from the adjustment screw
Make sure the derailleur is in the ‘on’ mode.
Locate the adjustment screw, which is located on the underside of the clutch, and remove the cover. For some, the rubber cover simply pulls off, but for some it has to be unscrewed using a 2mm hex key.
Top Tip
Don’t forget to securely fasten the cover at the end. This prevents any dirt or grime from getting into the system.
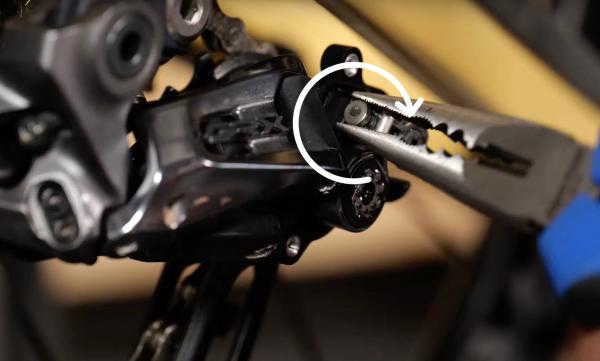
Step 3
Adjust the screw to tension the derailleur
Use either a 5mm spanner or some long nosed pliers to turn the adjustment screw. To tighten the clutch, turn the screw clockwise. If you ever need to loosen the tension in the derailleur, turn the screw anti-clockwise.
Only apply a small amount of torque when turning the screw and adjust it a little at a time.
Top Tip
Adjust the screw until the derailleur tensions the chain enough to avoid chain slap. You should notice extra tension in the derailleur cage if you attempt to push it forwards. Don’t overdo things, though, otherwise it can damage the system.
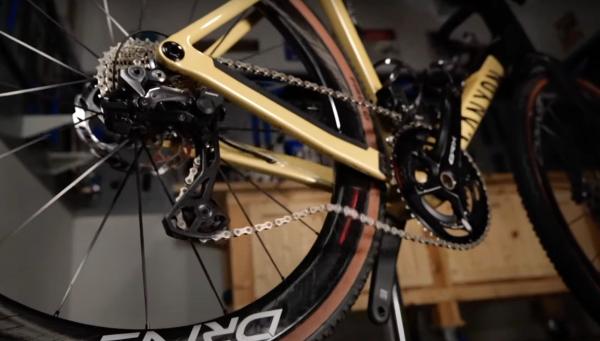
Step 4
Tests for chain slap
Once you’ve reached the desired tension, place the rubber cap back over the adjustment screw.
Tests things out on a ride. If you continue to have problems, it may be because the clutch has reached the end of its service life. Brands like Shimano provide service kits that allow you to replace worn parts.
.jpg?w=600&auto=format)
Related Content
How to remove and install Shimano cranks
Our guide for fitting and removing Shimano road cranks

How to change the stem on a road bike
A new stem can transform the fit and feel of a bike. Here’s how to replace a stem on a road bike

Take it easy! 25-minute aerobic indoor cycling workout
A steadier workout for low-intensity days, or for building into your indoor cycling gradually

VO2 max surges: 30-minute GCN indoor training session
Hank guides you through three five-minute blocks, each with a hard VO2 Max effort sandwiched between two sweet spot efforts