Top tips for buying a second hand bike
There are lots of great used bikes out there, you just need to know what to look for
Tom Hallam-Gravells
Online Production Editor

Oliver Bridgewood
GCN Tech Presenter
PhD Chemist turned cycling enthusiast, bringing the lab coat to GCN Does Science
What to look for when you buy a used bike
Bikes are expensive – brand new, even a lower-end model can set you back up to £1,000/$1,300/€1200. The best value is on the second-hand market from places like eBay, Facebook Marketplace, and Gumtree.
But there's always a level of trepidation when dipping into the used market for the first time. How do you find a bargain and avoid a clunker?
From what to ask the seller, to which components to check, here’s everything you need to know when you’re on the hunt for a used bike.

Question the owner
Start by questioning the owner. Don’t interrogate them, simply ask a few questions about the bike and their experiences using it. If nothing else, it’s a great way to build rapport with the seller. It may even lead to a little bartering.
Look out for any red flags. If it becomes clear that they’re not a cyclist but they’re selling an expensive bike, it should raise some questions - you don’t want to inadvertently buy a stolen bike.
Naturally, the main topic of conversation will often be the price. If the price is really low and it stands out as being an incredible deal, those red flags should be flapping. A deal that appears to be too good to be true usually is.

Check the bar tape
There are plenty of legitimate bargains out there, often from a seller who bought a bike with the intention of getting into the sport only for it to gather dust.
Look at the bar tape for clues. If it’s pristine and looks like the original tape, the bike probably hasn’t been ridden much. If it's been replaced, the previous owner probably looked after their bike. If it's worn and thin, it might be a clue that the previous owner didn't care much for the bike.

Check the braking surfaces
Have a quick scan of the brakes too. If there’s not much wear on the wheel rims or disc brake rotors and the pads are clean and unworn, it’s another sign that the bike hasn't been ridden very much.
If the braking surface is worn, budget in a replacement – if the braking surface on the rims is concave, you might need to replace the wheel. If the disc brake rotor is worn, it might need replacing. A new rotor is fairly cheap, but it's something to bear in mind.

Check for wear on the frame
Cables rub against a frame over time leaving marks where the paint has worn away. This is only cosmetic damage, but it's another indicator of how much a bike has been used.
Of course, for many cyclists, their bike is their pride and joy. That’s why many apply protective patches to their frames to prevent the cables from rubbing. If they’ve taken steps to protect the frame, you can be confident that they’ve taken good care of the rest of the bike too.
Check the chainstay, too. As the chain bounces up and down on rough terrain, it chips the paint on the chainstay. It's just cosmetic damage, but it shows how much the bike has been ridden and looked after.

Check the seatpost
Loosen the seatpost and check a couple of things.
Firstly, does it move? On metal bikes, seatposts have a tendency to seize in the frame. On carbon bikes, the seat clamp bolt is also one of the stress areas where damage can occur if the correct torque limits aren’t followed. Now is the chance to give it a quick once-over for any damage.
Secondly, set it to about the right height for you and check the bike fits you properly.

Check the drivetrain
The drivetrain is particularly susceptible to wear and its parts have to be replaced periodically.
The first thing to check here is the chain. Chains stretch over time and a stretched chain will accelerate wear to the rest of the drivetrain. You can easily check this using a chain tool.
Have a look at the teeth on the chainrings and cassette too. They should be fairly uniform in shape and not sharp or jagged like a shark’s tooth.

Check the bearings
The wheels, headset and bottom bracket all rely on bearings. Bearings reduce friction between two surfaces, ensuring smooth movement.
To check that the headset bearings are functioning correctly, simply hold the front brake lever and push the handlebars back and forth. There shouldn’t be any rocking. If the handlebars are hard to turn or feel like they’re grinding, the bearings may need replacing.
Next up, the bottom bracket bearings. Grab hold of either crank arm and try to move it laterally. There shouldn’t be any movement.
Finally, grab hold of the wheels and try the same test, attempting to move them laterally. Again, if they can move, it means the wheel bearings in the hubs need replacing. While you’re checking that part of the bike, spin the wheels too. If the wheel wobbles as it spins, it needs truing.

Check the wheels and tyres
Check that the wheels are running true by lifting each one off the ground and spinning it. Watch the way the wheel runs through the frame or brakes. If it's straight, it'll be consistent. If it's buckled, it'll wobble. This test will also give you a better idea of how well the bearings are running: the wheel should spin freely.
Check also the tyres. If they're worn out, with reduced tread, a flat centre or lots of cuts in them, you'll need to replace them. It's an easy job, but something that needs budgeting in.

Check the components for crash damage
The biggest risk when buying a second-hand bike is damage from a crash, which isn’t always easily visible to the naked eye.
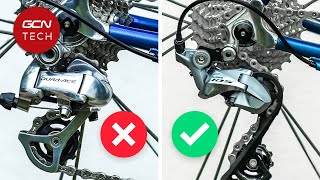
Sometimes, the most obvious sign isn’t the frame itself, but the components. The rear derailleur is often a victim, so if it has scrape marks, the bike has likely hit the tarmac at some point. Usually, a scuffed rear mech is just cosmetic damage, but sometimes it's a sign that the derailleur or frame are damaged. Shift through the gears to ensure they’re not skipping. Other areas to check for scuff marks include the saddle, shifters and bar tape.

Check the frame for crash damage
The frame is the thing to be most concerned about as damage may not always be obvious. It’s common for the top tube to incur damage as the handlebars swing into it. Turn the handlebars fully to one side to see where they would potentially strike the top tube and this will be the best area to check.
Believe it or not, alloy and steel frames can become warped from a crash too. This is rare and will require a tape measure to detect. Simply measure from the rear dropout to the same point of the top tube on either side of the bike. If the measurements are different, it’s best to steer clear of the bike.

Test ride the bike
Poking and prodding alone won’t give the best picture of a bike, so always take it for a quick spin if you’re able to. Now is the chance to check once again that everything functions as it should, including the gears and brakes.
Get out of the saddle and really crank on the pedals. Listen out for any creaking, especially from the bottom bracket area, and investigate if you have any doubts.
If a buyer won’t let you test the bike, it’s best to walk away. Why take the risk if you can’t be sure that the bike is functioning and safe to ride?
.jpg?w=600&auto=format)


Related Content

How to wax a bike chain
Waxing a chain is more complicated than applying lube but it's worth the extra effort

Beginner indoor training session: 20-minute sweet spot indoor cycling workout
If you're new to indoor training, this is a good session to start with. No super hard efforts or high cadences, just a good, entry-level session that will burn calories

How to change the stem on a road bike
A new stem can transform the fit and feel of a bike. Here’s how to replace a stem on a road bike

Take it easy! 25-minute aerobic indoor cycling workout
A steadier workout for low-intensity days, or for building into your indoor cycling gradually