Difficulty
Easy
How to fit new cleats to your cycling shoes
Setting up new cleats on your cycling shoes can be quite a fiddly process. Follow these steps to make fitting new cleats to your cycling shoes easier.
Tom Hallam-Gravells
Online Production Editor


Tools Needed

Step 1
Find the balls of your feet
Put on your shoes and find the balls of your feet. To do this, feel along the inside and the outside of your foot until you come to the widest point, where you can feel your bones pressing into the side of your shoes. This is going to determine how far forward or back you have your cleats.
Put some tape on your shoes where you can feel those bones, and use the permanent marker to mark the exact position on the tape.
Top Tip
If you are replacing old cleats, and you want to keep exactly the same cleat position on a current shoe, draw around the old cleat while it's still on the shoe. Then, when you take the cleat off, you know exactly where the new one should go. If you don't want a mark on the sole of your foot, you could use a pen that will wipe off quite easily once you've got your cleat on.

Step 2
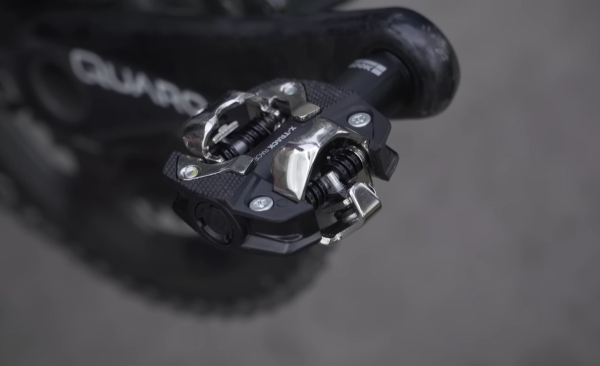
Grease the cleat bolts
Apply grease to each of the cleat bolts, and attach the cleats to the bottom of the shoe. Greasing the bolts is crucial – they’ll seize if put in dry. To get the right position, look for a little marker on the cleat that shows where the pedal axle sits, and line it up with your markers on the shoe.

Step 3
Check your natural foot position
Sit on a high chair, a desk or a table, and let your feet dangle naturally. Look down and make a note of how your feet have fallen – are your heels tilted inwards? Are your toes? Are your feet completely parallel? However your feet naturally fall, your goal is to replicate that on the bike by twisting your cleats side to side ever so slightly.

Step 4
Test and adjust
For this next step, you're going to need your bike. If you've got a turbo trainer, get your bike set up on it, but if not, either lean against a wall or get a friend to hold you. Pedal your bike (or back pedal if you’re leaning on a wall or a friend) and test the position of your cleats.
Based on feel, move them forwards or backwards. If they’re too far forward, they’ll feel like it's underneath your toes. And if they’re too far back, you might not feel like you’re getting enough leverage.
Consider whether you want to adjust your stance, which you can do by moving the cleats left or right. Just remember, moving your cleats inwards moves your feet out, and vice versa. If you do tend to pedal up with your knees outwards at the top of the pedal stroke, you might want to look to have them closer to the bike. Likewise, if you pedal with your knees inwards at the top of the pedal stroke, you might want to do the opposite.
Keep making little adjustments and testing until you feel happy with your cleat position.

Step 5
Film yourself pedalling
Next, film yourself spinning the pedals so you can check your position looks right. Ideally, film yourself from get one from the front and from the back so you can see your pedal stroke and the movement of your knees. This step might help you identify any issues with your position that you missed when testing based on feel.

Step 6
Try it on the roads
Finally, test your cleat position out on the roads. Head out for a relatively short ride to check the position, and for the next few rides, make sure you carry a multitool or allen key to make any adjustments to your cleats.
.jpg?w=600&auto=format)
Related Content
Clipless pedals: what are they and how do you use them?
We explain everything you need to know when going clipless.
Cheap versus expensive cycling shoes: what is the difference?
Are expensive shoes a worthy investment?

How to improve your pedalling technique
It may seem like there’s only one way to turn a pedal, but here’s how to fine-tune your riding

How to wax a bike chain
Waxing a chain is more complicated than applying lube but it's worth the extra effort