Difficulty
Very Easy
How to fit & remove bike pedals with ease
Replacing bicycle pedals can be confusing at first, but it doesn't have to be. These steps will make fitting and removing pedals on any bike easy

Oliver Bridgewood
GCN Tech Presenter
PhD Chemist turned cycling enthusiast, bringing the lab coat to GCN Does Science
Fitting and removing bike pedals is an essential skill for cyclists, and it's really easy to master. For building up a new bike out of the box or switching the pedals on your existing bike, this skill is going to come in handy. It only takes one tool and a few minutes.
Read more:
Tools Needed
Step 1
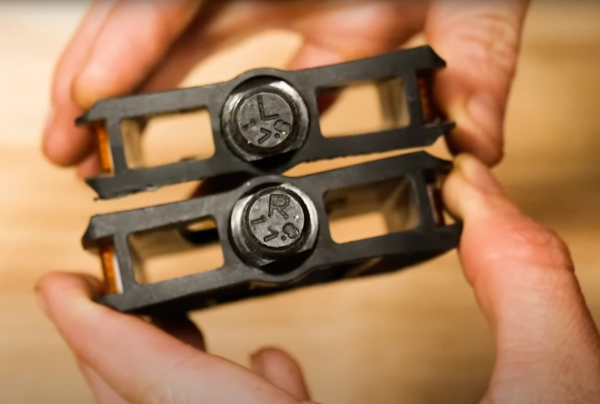
Identify left and right pedal
Pedals are left and right specific, so you need to ensure you’re installing the right-hand pedal on the drive side (chainring side) of your crank arm and the left-hand pedal on the non-drive side. Handily, pedals often have a L and R printed on them to indicate which one is which.
Left and right pedals have opposite threads, so a right-hand pedal has a clockwise thread and a left-hand pedal has an anti-clockwise thread. This is to stop the left pedal from unwinding as you pedal along.
Top Tip
The easy way to remember which way to turn them is by thinking about it in relation to the bike. When tightening pedals, the top of the axle should be turning towards the front of the bike, and when loosening them, it should be turning towards the back of the bike

Step 2
Lean the bike against a wall
When fitting or removing pedals, it’s easier to do it with the bike leaning on a wall rather than in a workshop stand. Having your bike on the ground means you can put your weight through the bike if you need to when removing pedals.

Step 3
Thread each pedal in by hand
Rotate the crank arm into the forward position and, if you’re able, start to thread the pedal into the crank by hand, as this way you’re less likely to strip the threads on the pedal should you accidentally cross-thread it.
Top Tip
If you’re installing used pedals onto a used crank, it’s a good idea to wipe off the old grease from both parts and apply some fresh grease before fitting the pedals. This will stop them seizing together over time.

Step 4A
Tighten with an allen key
Once it’s hand-tight, use your Allen key to tighten the pedal. Push down on your Allen key while pulling up on the pedal to tighten – it doesn’t need to be super-tight though.

Step 4B
Tighten with a pedal spanner
If using a pedal spanner instead of an Allen key, attach the spanner to the pedal via the little notch at the end of the pedal threads. If you don’t have a pedal spanner, a regular 15mm spanner should fit if it’s not too thick.

Step 5
To remove, simply turn the other way
To remove pedals, simply turn the threads in the other direction. Make sure you’re going the right way – the pedals unthread towards the back of the bike.
Top Tip
If you’ve got a really tight pedal and you’re struggling to get it off with the Allen key or spanner, a tube or a piece of pipe can be very useful. Slip the pipe over the end of your Allen key to create a longer lever. This additional leverage should hopefully remove the pedal more easily.
Related Content

The full pyramid: 30-minute HIIT indoor cycling workout from GCN
A 30-minute HIIT workout for developing anaerobic fitness, led by Manon Lloyd

How to replace a gear cable on a road bike
A new gear cable can reduce friction and improve shifting. Here’s how to change a gear cable on a road bike

How to wax a bike chain
Waxing a chain is more complicated than applying lube but it's worth the extra effort

Beginner indoor training session: 20-minute sweet spot indoor cycling workout
If you're new to indoor training, this is a good session to start with. No super hard efforts or high cadences, just a good, entry-level session that will burn calories