From box to bike – how to assemble a brand new bike
Here’s how to safely set up your new steed so you can ride with confidence


When your bike arrives, you can typically expect to find it in a semi-assembled state. Usually, this means it will have been fully built and serviced by a mechanic and then partially disassembled to fit into a box for shipping.
Read more: Essential skills for new cyclists
Here, we go through what you need to do from unpacking your bike to getting it ready to ride. The chances are, your bike will come with the tools you need to assemble it, but in most cases, these are low-quality, cheap tools. We'd suggest investing in a decent toolset of your own. Higher quality tools will last longer, and there's less chance of them rounding out the bolts on your bike.
Read more:

Remove the packaging
First things first – open up the box and remove your bike. Be careful of the industrial staples that tend to be used on the lid of the box – they can be very sharp. You’ll usually find it with the rear wheel fitted, bars and stem removed and strapped to the side of the frame, and the front wheel stored in the box separately.

Carefully cut off packaging
Rest the bike on the back wheel and the tips of the fork and set about taking the packaging off the frame. When you’re snipping the zip-ties around the bike, be careful not to scratch the frame.
Take a minute to sort out all the packaging. It’s a good idea to keep it all in the bike until you’re confident you don't need to send your bike back for any reason.

Grease the seatpost
Before you fit it into the frame you need to prime your seatpost with some grease or assembly paste. If the frame and post are made of alloy use regular grease. If either part is made of carbon fibre, use a carbon assembly paste – which will add a bit more friction to the mix and help stop the post slipping.

Install the seatpost
Some bikes have an external seatpost collar, which needs to be fitted to the frame before installing the post. If your frame has a more modern internal wedge type of seatpost clamp, make sure you add a touch of grease (not fibre grip) to this too. Put the seatpost into the frame and tighten it in just enough to keep it in place. You’ll set the height and properly tighten the bolt later.
Top Tip
If your new bike has Di2, it’s likely the battery will be housed inside the seat tube and the cable will be poking out from the top – usually taped to the frame. Simply plug this cable into the battery before fitting the seatpost and ensure not to pinch the cable between the seatpost and the frame.

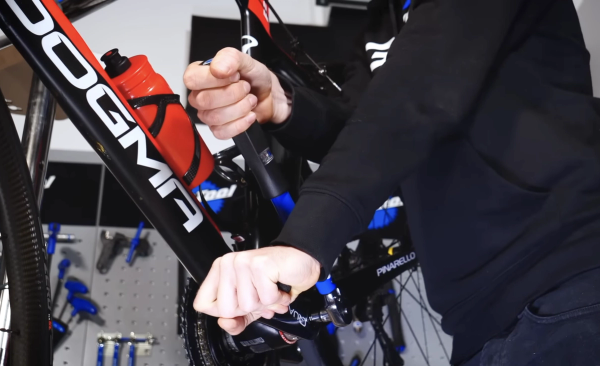
Fit the stem and bars
The stem will likely be loosely fitted to the steerer tube to stop the fork dropping out, so you just need to line it up with the forks and tension the headset. You may wish to lower it once you’ve ridden the bike.
Remove the faceplate from the stem, and be careful not to lose any of the bolts. Place the centre of the handlebar in the open stem, taking care not to trap any cables or hoses between the bar and stem. Grease the stem bolts, then reinstall the faceplate and tighten up the bolts just enough to stop the bars from slipping around – we’ll set the position of the bars properly later.

Remove the brake spacer from the fork
If your new bike has disc brakes, check there isn’t a pad spacer in the calliper to stop the pads being pushed together during transit. If there is one, remove that and keep it – they’re quite handy to have around.
If the bike has rim brakes, ensure the quick-release lever on the calliper is open to make sure it’s as easy as possible to slot the wheel in.

Put in the front wheel
If your new bike has disc brakes, check there isn’t a pad spacer in the calliper to stop the pads being pushed together during transit. If there is one, remove that and keep it – they’re quite handy to have around.
If the bike has rim brakes, ensure the quick-release lever on the calliper is open to make sure it’s as easy as possible to slot the wheel in.
When you’ve done that, simply lift the front of the bike up and slot the wheel in place. It’s easier to do it on the floor rather than in a workstand, as you then know the wheel will sit centrally.
Whether you’ve got a quick-release or a thru-axle, it’s important to apply a small amount of grease to stop it seizing in place or squeaking/ creaking. For thru-axles, pay particular attention to the threads.

Tighten the headset
Loosen the stem bolts and tighten the top cap to remove any play in the headset, while still allowing the bars to turn without any resistance. Then, tighten the stem bolts up to the recommended torque setting, usually about 5Nm.

Straighten the bars
Swing a leg over the bike and grab the shifters. Based on your preference, you can tilt the bars towards or away from you to make your position on the hoods comfortable. Just loosen the faceplate bolts, set the position, then tighten them again. Make sure to tighten the faceplate bolts in sequence (working on opposite corners in an X-pattern) and ensure there is an equal gap between the faceplate and the stem on the top and the bottom.

Set the saddle height
Next, set the saddle height. We’ve got a guide giving the best method to set your saddle height, but you can also set it by measuring your old bike. Once you’re happy with the position, make sure the clamp is appropriately torqued up and also check the actual saddle clamp bolt, too – these usually have a higher torque of around 10 to 12 Nm – but do check the exact torque on the saddle rails and the saddle clamp itself.

Check the gears
Things can get knocked about in transit, so it’s worth checking the gears, and especially the brakes, before you head out for your first ride.
To check the gears, you can either mount the bike in a workstand, lift the rear wheel off the ground by hooking the saddle behind your neck, or ask a friend to hold it for you. Then simply keep the cranks turning and shift through the whole cassette in each chainring.
If you find the gears around the middle of the cassette shifting slowly or not at all, you may have a bent mech hanger. If so, while straightening is sometimes possible, it’s usually better to order a replacement.

Check the brakes
Spin each wheel to make sure the brakes aren't rubbing. You'll hear if they are. For rim brakes, you can resolve brake rub by twisting the callipers slightly, or adjusting the cable tension. For disc brakes, you can try re-centring the callipers.
Check the brakes work properly too, by pulling on the levers. If your hydraulic brakes aren't working, they might need a bleed, so see our guide for bleeding hydraulic brakes.
Final bolt check
One last safety check before you ride – go back over every bolt on the bike and make sure they’re all torqued appropriately. This is a simple process, but it’s easy to miss a bolt or forget to tighten something up – and it’s much better to discover them in your garage than out on the road.
Pump up the tyres, and you're ready to ride!
Latest Videos
1Will Tadej Pogačar Win The Giro AND The Tour? | GCN Racing News Show

2How to Upgrade Your Disc Brakes
3I Took A Recumbent To A Bike Race... This Is What Happened!
4This Recumbent Superbike Is Faster Than Your Road Bike! Here's Why...

5Experience Vs Power! Can Simon Defeat The World’s STRONGEST Cyclist?

Related Content
Team time trial: 20-minute HIIT indoor cycling workout
This HIIT spin bike workout replicates the varied intensities of a team time trial effort

The full pyramid: 30-minute HIIT indoor cycling workout from GCN
A 30-minute HIIT workout for developing anaerobic fitness, led by Manon Lloyd

How to replace a gear cable on a road bike
A new gear cable can reduce friction and improve shifting. Here’s how to change a gear cable on a road bike

Over/under threshold intervals: 35-minute HIIT indoor cycling workout
Join Manon Lloyd for this tough over/under threshold workout which replicates race efforts and improves endurance